#git과 Visual Studio Code가 설치되어있어야 합니다.
깃 설치는 아래에서. 아이디도 있어야 하니 회원가입(Join in) ㄱㄱ
Git
git-scm.com
VScode 설치는 >> https://code.visualstudio.com/
Visual Studio Code - Code Editing. Redefined
Visual Studio Code is a code editor redefined and optimized for building and debugging modern web and cloud applications. Visual Studio Code is free and available on your favorite platform - Linux, macOS, and Windows.
code.visualstudio.com
#VS Code를 실행하시고, Extensions 설치합니다.
저는 Git Extension Pack 과 Auto-Open Markdown Preview를 설치했습니다.

# 하단의 setting에서 터미널 설정 변경하기
terminal.integrated.shell.windows를 C:\\Program Files\\Git\\bin\\bash.exe로 바꿔줍니다.
VSCode터미널에서 git을 편하게 실행시키기 위함입니다.
기존에는 C:\\Windows\\System32\\WindowsPowerShell\\v1.0\\powershell.exe로 설정이 되어있네요.


# README.md 파일을 하나 작성해줍니다.

#터미널 창을 열어주세요
아까 설정을 잘 해주었기 때문에, 터미널 창을 켜면 git bash가 잘 실행이 됩니다.

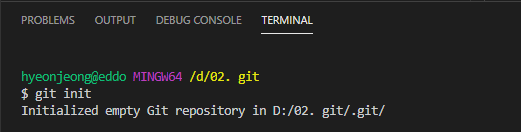
#git init
현재 열려있는 경로를 깃의 로컬 저장소로 지정해줍니다.
# git config --global user.name "NICKNAME"
# git config --global user.email "EMAIL@gmail.com"
위 두 명령어로 초기 환경 설정을 할 수 있습니다.
#git status
저장소의 상태를 출력해줍니다. README.md 파일을 add 하라고 나오네요 ㅎㅎ

# git add
하라는 대로 해줍니다. add 해주고 상태 확인을 하니, 빨간 글씨가 초록 색으로 바뀌었습니다.

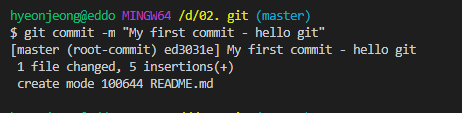
# git commit -m
드디어 로컬 저장소에 커밋을 해줍니다. m 은 message 일걸요? 해당 커밋을 설명하는 comment를 달아주면 됩니다.
원격 저장소 (GitHub)에 코드 올리기
>> 우선 GitHub 에 로그인 하셔서 레파지터리를 하나 만들어줍니다.
# git remote add origin 깃허브레파지터리주소
# git push -u origin master
하고 원격 저장소에서 확인하면 올라가있습니다.
'Computer Science&Engineering > 깃허브' 카테고리의 다른 글
| VisualStudio2019에서 GITHUB 연결하기 (0) | 2020.11.11 |
|---|
